Guide to your company admin account on the APA website

If you’re a designated Company Admin, you will be able to make changes to your company account. Below you'll find details of how to manage your company account, including adding and removing staff, company admins and delegates, updating directory information and paying invoices.

If you're having problems accessing your account, see the general user guide for details on logging in for the first time.


Accessing Company Account

If you’re a designated Company Admin, you will be able to make changes to your company account, including adding and removing staff, company admins and delegates, updating directory information and paying invoices.

To access your company account, click on your name at the top right-hand corner of the homepage and then click on your company name - you’ll find this just below your name in the page header, eg. Australian Publishers Association.

This will take you to your company page:

Adding and removing staff

To add a staff member, click on the ‘People’ tab, scroll down to the full list of company staff and click on ‘Add contact’ (in blue text below the company name - see below).

This will bring up a pop-up box that you will need to fill in and save.

To remove a staff member, scroll down to the full list of company staff and click on the title next to the staff member’s name, eg. for Andrew Brown this would be ‘Marketing & Community Development Manager’.

This will bring up a pop-up box. Click on the red cross next to the member’s name to delete the staff member from your account.

Adding and removing Company Admins

Company Admins are staff member(s) who can make changes to your organisation's account, including adding and removing staff, managing other company admins and roles as below, as well as updating directory information and paying invoices.

To add a company admin, in the company profile, click on the ‘People’ tab, scroll down to the full list of company staff and click on the title next to the staff member’s name. Click on the ‘Add new’ button, on the right above the role table. Company Administrator will be selected by default. Click on ‘Save & Close’.

To remove a company admin, scroll down to the full list of company staff and click on the title next to the staff member’s name. Click on the red cross next to the ‘Company Administrator’ line.

Note: A list of company admins is present on the 'People' tab, above the full list of company staff. This list is for reference only. Changes to company roles must be made through the full list of company staff.

Adding and changing company roles/relationships

To view company roles/relationships, click on the ‘People’ tab. Staff members with specific administration roles are listed under the ‘Company Roles/Relationships’ heading.

Specified roles/relationships include:
  • APA Delegate: If the organisation has a Full Publisher membership, nominated delegates can vote at the AGM. The delegate will also receive membership renewal notices.
  • Primary Contact: This staff member is the main point of contact for communications between the APA and the organisation.
  • Finance Manager: We will contact the Finance Manager for membership renewal notices and financial reporting.
  • Accounts/Invoices: This is the staff member who will receive day-to-day invoices (event bookings, export/freight costs, award fees, etc.) and accounts enquiries.
  • Metadata Contact: The person in charge of bibliographic data and its distribution, and/or your TitlePage contact.

Some contacts may fulfil multiple roles.


To add or change company roles and relationships, submit a request using the 'Enquiry/Update' button to the right of the screen. In the pop-up window, select 'Update Role/Relationships' in the Enquiry/Update type field. Provide the details of the change in the following field. If multiple changes are needed, use the file upload field to submit a mass update.


Invoices

Viewing invoices

To view invoices and transactions, click on the ‘Finance’ tab. Under this tab, open invoices are listed first, followed by recent transactions and invoice history. 

Click on ‘View Statement’ to view, download and print open invoices. Further information on listings under the ‘Recent Transactions’ and ‘Invoice’ headings can be viewed, downloaded or printed by clicking on the order or invoice number.

Pay an open invoice

To pay an open invoice, select the check box in the ‘Pay’ column next to the invoice number. Click ‘Add to Cart’.

The invoice will be added to the Shopping Cart, where it will remain until the transaction is completed.

The Shopping Cart can be accessed by clicking the trolley icon in the top right of the screen.

Fill in your payment details and click 'Submit Order'. If you have any issues or queries about payment, please get in contact with the APA at [email protected].

When a company has open invoices, a notification will be present to the right of the company profile screen. This notice will also appear on the profile screen of any company administrators.


Review and Update Organisation Information

To update the organisation profile image, navigate to the company account page, as described at the top of this guide. Click on the pencil icon above and to the right of the existing profile image.

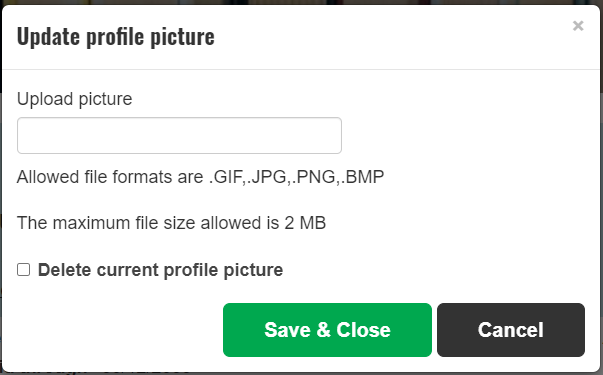
This will open a pop-up box prompting upload of a new image. Allowed file formats are .GIF,.JPG,.PNG,.BMP. The maximum file size is 2MB. Click the box below ‘Upload Picture’ and select the desired image using your device’s file navigation system. Click the ‘Save & Close’ button.

The organisation name and contact number can be updated by clicking the pencil icon to the right of the name on the company account page. Update the details in the pop-up box and click ‘Save & Close’.

About

Further information can be updated under the ‘About’ tab on the company account page. To add a new address, under the ‘Addresses’ heading, click the ‘+’ button to the right of the existing address.

Fill in the address details and purpose in the pop-up box and click ‘Save & Close’.

Addresses can be updated by selecting the desired address tab and clicking the pencil icon in the upper right corner of the tab. Update the address details in the pop-up box and click ‘Save & Close’.

To update information under the ‘General Company Information’ and ‘Sector and Services’ headings, click the pencil icon to the right of the heading. This will enable the fields beneath these headings to be edited. Update the required information and click ‘Save’.


Update Directory Information

To update the company’s details on the publishing directory, click on the ‘Directory Information’ tab.

Click the pencil icon next to the section which needs updating - Company Description, Distribution, Agencies and Imprints, or Company Socials. This enables fields to be edited. Update the information and click the save button.


How to sign up for a TitlePage subscription

This guide covers how to purchase a TitlePage subscription. For more information about TitlePage, and how to register, visit the TitlePage section on the APA website.

To purchase a TitlePage subscription, navigate to the organisation profile, following the steps outlined earlier in this guide. If your organisation is flagged as eligible for a TitlePage membership and does not already have one, you will see a button prompting a TitlePage subscription. If you do not see this button, but believe your organisation is eligible for a TitlePage subscription, please access the Enquiry/Update form using the black button on the right of the screen as outlined earlier in this guide. 

Clicking this button opens the TitlePage Join Wizard. Fill in the organisation's turnover from the previous financial year, as well as the number of titles the organisation intends to list on TitlePage. Click the 'Next' button to calculate the TitlePage fee.

On the following page, check the box on the 'TitlePage Subscription' line and click 'Add to Cart' or 'Update Cart'. Click the finish button to proceed to the Shopping Cart. Follow the steps outlined earlier in this User Guide to complete checkout.


Further Assistance

For further assistance, access the Enquiry/Update form using the black button on the right of the screen. 

In the pop-up window, fill in the details of the enquiry or update. 

Select the type of enquiry/update and provide details in the following field. If necessary, upload a file with further information or content.